| MAGNIFICATION OF GEMS A reasonable question which might be asked is, "Why magnify a gemstone"? After all, we don't go around with magnifiers looking at our gems and jewelry, we just view them with the naked eye. There are several very good reasons, though, why it's desirable and in some cases, necessary, to get an interior view :
1. Appraisal/Insurance/Repair :
In order to assign a value to any gem, it must be graded, that is, a determination must be made as to how fine, and how rare it is, and what its "market" or "replacement" value would be. Part of the grading process which determines these values, especially in diamonds, is done under magnification.
The magnified view of any gem, plotted onto a diagram, can then serve as its "fingerprint". It is about as unlikely that two gems will have the same number, location, and type of inclusions and internal growth features, as it is that two people will have the same fingerprints, or the same DNA.
Such a drawing will also give the jeweler who is receiving a valuable jewelry item for cleaning or repair, and the customer, a way to verify that the gem taken in is, in fact, the same one which is returned.
2. Gem Identification/Gem History :
What is it? Although this question can usually be answered by tests of those physical and optical properties discussed in Lessons 3 and 4, finding certain inclusions can make the job easier, and in some cases eliminate the need for further tests. In addition, some optical and physical properties are best revealed under magnification.
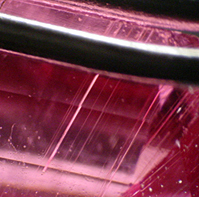
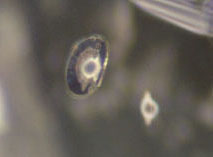
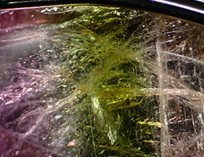
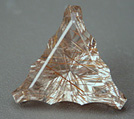
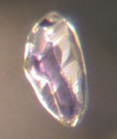
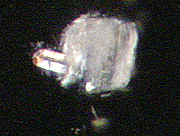
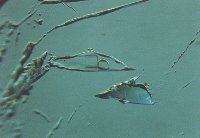
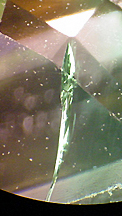
The characteristic growth tubes inside this gem narrow the most likely identification possibilites to beryl and tourmaline (it's a tourmaline)
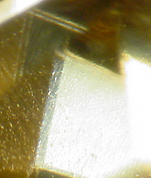
The doubled facet reflections seen under magnification in this sphene and zircon, serve as clues to gem identity : few species have birefringence this high Is it natural or synthetic? Once the question of the species or variety has been answered, then it is necessary to know whether the gem is natural or synthetic. (Remember, synthetics are the gem, and, therefore, have all the chemical, physical and optical properties of the natural version). One of the best tools at a gemologist's disposal, in trying to make this call, is magnification.
There are certain inclusions found only in natural stones, and others found only in synthetics. In many cases, then, seeing a certain inclusion is definitive. Unfortunately, there are also inclusions which can be found in either type, and some gems that are so totally clean, there are no inclusions to use.
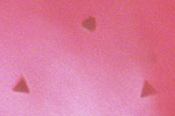
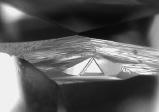
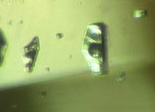
The triangular platinum Crystals which were eroded from the crucible in which this synthetic Alexandrite was formed, give proof of its man-made origin Has it been enhanced, and if so, how? Certain enhancements (and imitations) can be most easily detected by a magnified view of the surface, or the interior, of a gem.
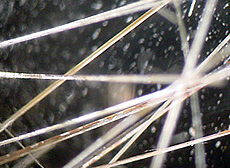
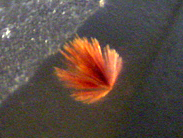
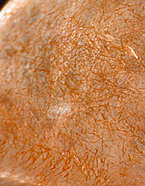
The intact "silk" (rutile needles) in this sapphire proves that it has not been subjected to high heat, and is of natural color, whereas the stress fractures in this heated sapphire give evidence of its treated state Where, specifically, did it come from? Though not a factor in most cases, there are a few important instances where the geographic location of a gem's origin is crucial in setting its value. In those situations, it is often possible by seeing diagnostic inclusions or growth features to specify the location. Only peridot from Arizona shows a characteristic stress fracture/included crystal combination known as a "lily pad", and only demantoid garnet from Russia, shows microscopic curving fibers of bryssolite asbestos known as a "horsetail".
Lily pads in Arizona Peridot
A horsetail inclusion in Russian Demantoid Garnet 3.
You can see very cool things :
Tools :
The two tools most often employed in gemstone magnification are the loupe and the gem microscope.
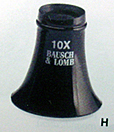
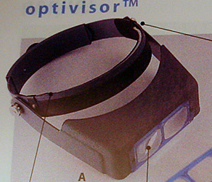
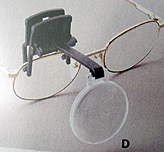
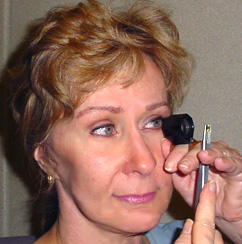
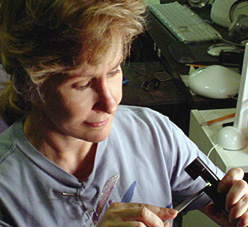
The loupe: A loupe is a small magnifying device, which, most commonly, magnifies the object to be viewed to ten times its size (10x). There are five major types used by those observing gems: handheld, eye socket, headpiece, eyeglass, and darkfield. Each has its advantages and particular best use. The handheld version is the most versatile, and the darkfield type supplies a source of specialized lighting important in some aspects of gem identification and/or grading. The eyesocket, headpiece and eyeglass types have the advantage in situations where leaving the hands free is important.
Handheld
Eye Socket
Headpiece
Eyeglass
Darkfield In general, the advantage of a loupe over a microscope is its portability and low cost. On the other hand, the loupe's capabilities of magnification and lighting are limited compared to most microscopes.
Warning :
Some of you probably already own a loupe or have taken the advice from the course syllabus and recently acquired one. So, before we get any further into the technical aspects of magnifying tools and techniques, let me give a warning: Use this tool with caution the view can be scary sometimes! The first time a new loupe-user looks at their favorite piece of gemstone jewelry at 10x, they are in for for a rude awakening.
A piece of gemstone jewelry which has been worn to any extent (and which looks perfectly fine to the naked eye) shows, to the examiner with a loupe, scratches and gouges in the metal, and glaring manufacturing flaws like incomplete solder joints. Upon turning his/her attention to the gem, what meets the eye is globs of dirt and grime surrounding the gem, and in most cases startlingly visible "crud" inside the gem, and/or worrisome chips, scratches or fractures on its surface.
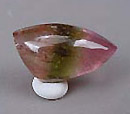
By way of demonstration, let's look at a couple of perfectly lovely gemstones: a (rather expensive) Tsavorite garnet, and a modestly priced bicolored tourmaline cabochon.
The Tsavorite gem has no visible problems and looks great, completely transparent and full of sparkle and color. The tourmaline, as is the case with most cabochon gems, is of lower quality than a piece that would have been faceted, and is translucent, but still very attractive.
The view using our loupe, is somewhat different :
OK, now that I've properly warned you, let's look on the bright side and view some of the "very cool" things mentioned above :
Just for fun :
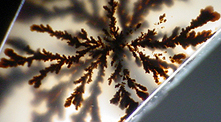
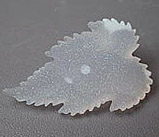
Here's a nice dendritic chalcedony which at 10x really shows the three dimensional nature of the dendrites and gives some insight into their growth pattern as well.
Two interesting drusy gems, but at 10x we can actually tell that their surfaces are lined with real crystals (albeit small).
Drusy Quartz
Drusy Vanadinite
Rutilated quartz
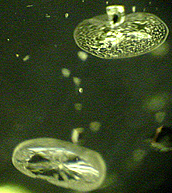
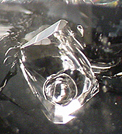
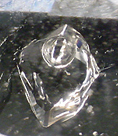
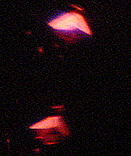
Rutilated quartz at 10 X The pair of pictures below is of the same inclusion within a gem the gem has been tilted about 30 degrees in the second shot. What you are seeing is the movement of a gas bubble within a pool of liquid within a cavity in the gem. The first time you look inside a rock and see something moving it's quite a thrill! Such a moveable bubble is referred to as an "enhydro" and is much sought after by collectors.
An "enhydro" inclusion in Quartz The Hand Loupe :
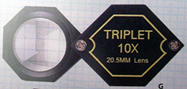
Triplet
Loupes :
This distortion is of two types : chromatic and spherical, and both types are caused by the curved shape of the lens, particularly at the edges where the curvature is the greatest. In chromatic distortion, the unequal bending of the different color wavelengths creates dispersive color fringes at the edges of view. In spherical distortion, a similar mechanism causes the image itself to curve and be out of focus in those areas.
Single lens loupes are available at very low cost, and are just fine for non-professional applications. If your loupe is not a triplet type, no need to worry all you need to do to compensate, is to confine your observations to the central area under view, and things will be fine.
Hand loupes can be found from 2x to 30x magnification. It might seem a good choice to purchase the one with the highest power, but typically that is not the case. There are three reasons :
1. The higher the power of magnification, the shorter the "focal length" the distance from the lens to the object so that it is in focus. For a 10x lens that distance is one inch, (20x = 1/2 inch, and 30x = 1/3 inch). It is difficult enough to work with a 1" clearance, let alone any of those shorter distances!
2. The shorter the focal length (higher power) the less light can enter the gem. Again, getting proper lighting at a distance of 1" can be a challenge, but it is very much more difficult at the shorter distances available at higher magnifications.
3. The higher the power of magnification, the smaller the "focal area" the size of the patch that you are magnifying. It can take quite a while to throughly examine all areas of a gem while using 10x, the job becomes harder, the smaller the "patches" you are looking at.
It should not be surprising then, that the vast majority of loupes in use are 10x.
Most loupes come with a metal cover that doubles as a "finger hold" or handle. The correct technique for using a loupe is pictured and described below :
1. Put the index finger of your non-preferred hand (left hand for righties, and vice versa) through the loupe cover and bring the loupe to rest against your thumb which is resting on your cheekbone. (This gives you just about the right eye-to-loupe distance.
2. In your other hand are your tweezers with the stone (either a girdle to girdle, or a table to culet hold is fine). The tips of the tweezers are between your middle and fourth finger. This allows you to easily and stably pivot the stone forward and back (with the hand holding the tweezers) to adjust the focal length to the 1" required.
3. Once you have mastered the basic "hold" you can actually focus on different "depths" within the gem by slightly increasing or decreasing the gem's distance from the loupe. First bringing the surface into focus, for example, then moving the focal area into the interior and finally to the bottom of the gem.
4. Unless you have severe astigmatism you do not need to wear your glasses.
5. Keep both eyes open. If you haven't used magnifying devices before, this takes some discipline to do, as your natural inclination is to close one eye. You can view comfortably for a much longer period of time with the "two eye" technique, and as a bonus, you usually don't end up with a headache.
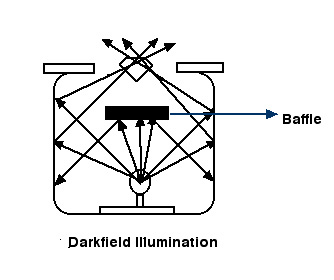
The Darkfield Loupe :
The ideal lighting condition for revealing inclusions in a gem is known as: "darkfield illumination". In this situation the gem is viewed against a black background with the light coming through it only from the side. The effect is to make any interior features stand out sharply in relief, and to be much more noticeable than with ordinary lighting. Although gem microscopes provide this lighting choice, most loupes do not. The exception is a device known as a darkfield loupe. The housing into which the gem is placed for viewing has a central, black baffle which prevents light from the source (usually a small "maglite" type of flashlight) from shining straight into the gem. Instead the light is reflected from the shiny sides of the housing to enter the gem sideways.
The technique for using a darkfield loupe, couldn't be simpler: the gem, in its tweezers, is simply rested in the opening and viewed at a comfortable distance. These are much more expensive than hand loupes, but for those who need to grade gem clarity on a regular basis, are well worth it.
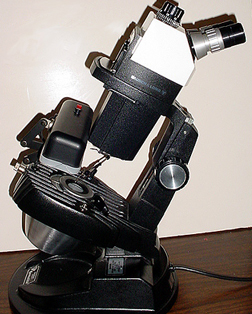
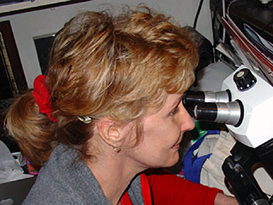
Gem Microscope :
A gem microscope is similar to a biological or medical microscope in that it is binocular, and uses compound lenses. A binocular magnifying device has two eyepieces so that both eyes are used at once. This is ideal for getting a good three dimensional view. In a compound scope, there is a set of lenses close to the object being magnified (objective lenses) and a set in the eyepieces (ocular lenses). With this set-up, magnification is compounded, meaning that, for example, if the objective lens is 5x and the ocular lens is 10x, the total magnification is 50x.
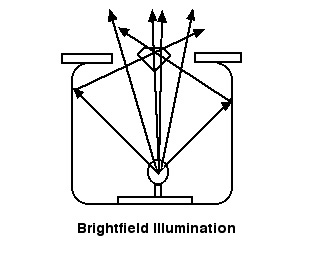
Gem scopes differ from biological scopes in that the total maximum magnification is usually lower (about 70x as compared to as much as 1000x) and there are more lighting options. For example, a good gem microscope has: brightfield illumination, darkfield illumination, oblique lighting, overhead lighting, a light diffusing system, a system for immersing the object in liquid in a well for viewing, and a light polarizing set up. They also generally come fitted with a pivoting stone holder.
A typical gemological microscope
Both eyes open is best In the diagrams of the under stage areas of the microscopes below, you can see a comparison of brightfield and darkfield illumination.
With brightfield lighting the light entering the gem comes from below as well as from the side. The amount of light entering the viewing area is manually controlled by an iris diaphragm, and frequently diffused with a special frosted glass coverplate. This type of lighting is ideal for seeing color zoning, dye concentrations, and the curved growth bands indicative of certain types of synthetic gems.
Also important is overhead lighting (sometimes called reflected or incident lighting). In this case the light source in the well of the microscope is turned off, and an overhead light used instead. Such illumination is excellent for examining the surface of the gem for blemishes, and for details of the finish, such as polish and facet meets.
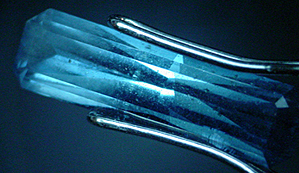
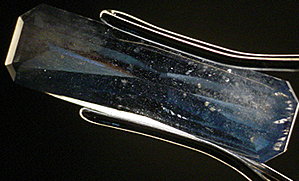
Compare the two pictures below taken of the same gem (at 10x magnification) under reflected light and darkfield. Notice how the surface features are so much more noticeable in the first instance, and the internal features better displayed in the second.
What Can Be Seen? :
The clarity characteristics of a gemstone are divided into those that are seen on the surface (blemishes) and those in the interior (inclusions).
Blemishes and other surface features: In this category are chips, scratches, knicks and abrasions, as well as attributes of the faceting or lapidary process such as degree of polish, or shape and placement of facets. A survey of the outside of the gem can yield several important results.
1. Gems are graded for color, clarity and cut. Some of the surface features are used in setting the gem's clarity and/or cut grades. Surface features, in general, affect the clarity grade less than do inclusions, but there are some important exceptions. A surface-reaching fracture, for example, is considered a blemish, but it greatly diminishes a gem's clarity grade because it decreases durability.
2. The surface view can yield important gem identification information.
Examples would be abraded facet junctions which give hardness clues, or characteristic surface features like the "engine-turned" effect that is diagnostic for elephantine ivories.
3. Telltale signs of imitation gems or gem enhancement are often observable on a gem's surface. This would include concave facets or mold marks as seen on glass and plastic, and dye concentrations in surface reaching fractures.
Below are some examples of important surface features :
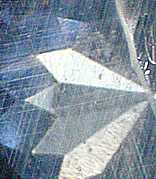
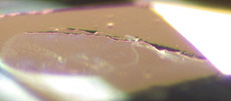
An unpolished area of a Diamond girdle (a "natural") showing "trigons" : Triangular growth marks that prove Diamond identity
The "engine-turned" effect proving natural, specifically elephantine Ivory
A surface reaching fracture in a Sapphire which substantially lowers its clarity grade Inclusions
and other internal features :
1. Solids :
Crystals can be large or small, they can have an RI similar to, or quite different from, their host, and they can be many different species, including the same species as the host.
Not only are the crystals likely to affect the clarity grade of the gem, they also can be suggestive or diagnostic of its species, enhancement status, or location of origin. Included crystals with rounded, rather than sharp edges, can be indicative of high temperature heating for example which might occur naturally or during certain types of treatments.
The majority of crystals are either formed at the same time as the gem, from other minerals present in the melt, vapors or fluids, or pre-existing ones which the growing gem captures. Less frequently, the crystals appear after the gem is first formed.
A noteworthy process, in this regard, is "exsolution". It occurs after the initial formation of the gem, and involves re-crystalization of materials which may, initially, have been dissolved in the gem.
Gems may have several stable points of temperature and pressure at which they can crystallize. Picture a gem forming at one set of conditions and then later being partially, or wholly, remelted and subjected to new conditions. Rutile, for example, can be dissolved in corundum, or exsolved. When it exsolves it crystallizes as discrete needles. This phenomenon is used by gem treaters to add or subtract rutile needles from sapphire at will, respectively ehancing the potential star in a gem, or clarifying a cloudy one.
Another "after the fact" way in which crystals get into a gem is by invasion of cracks by fluids. This is the mechanism by which the dendrites in chalcedony form, as well as that which is responsible for the seams of precious opal in a matrix rock.
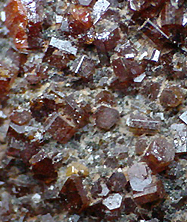
Spinel Crystals in Spinel
Diamond Crystal in Diamond
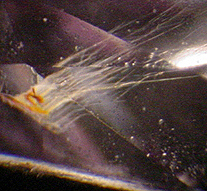
Goethite "sheaf" in Citrine
Cubic and Prismatic Crystals in Beryl
Fibrous hematite cyrstals in strawberry quartz 2.
Cavities :
Bubbles usually can be distinguished by their rounded or oblong shapes, and their very high relief. In cases of doubt as to whether something is a bubble or a rounded off crystal, polarized light can generally be used to discriminate.
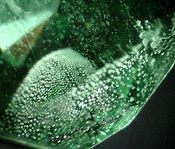
Bubbles in Moldavite (a natural glass)
Bubbles in Cubic Zirconia (a synthetic) Cavities with both a liquid and a gas trapped inside are called "two phase" inclusions, and those that also contain a solid crystal are termed "three phase"inclusions. In the vast majority of cases, two and three phase inclusions are indicative of natural origin.
Classic three phase inclusions in Emeralds from Chivor, Colombia
Two phase inclusion in Emerald 3.
Cracks :
Feathers can occur during the formation of a gemstone, perhaps as a result of rapid heating or cooling, or through pressure or mechanical stress. They can also occur long after the formation process, for the same reasons. They can be entirely within the gem or can reach the surface.
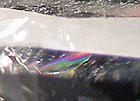
Under some conditions such a break within a gem can act as a diffraction grating and create a small dispersive rainbow of color, known as a "cleavage rainbow".
Cleavage rainbows in a quartz specimen with an internal fracture
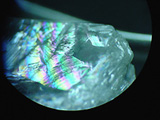
Cleavage rainbows in a piece of diamond rough with an internal fracture Surface-reaching fractures not only impair durability, they also are portals for fluids to enter which may cause stains or, in the case of enhancement, accept and concentrate dyes.
A non-surface reaching feather within a Tourmaline
A surface reaching crack in a Sapphire showing natural staining material
Feathers that exist within a still-forming gem, can be partially healed by penetration of growth fluids, or later by partial remelting of the material. Such partially healed cracks often show up under magnification as a series of tiny dots in rows or arcs. They look quite a bit like their namesake: "fingerprints".
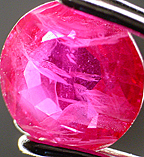
A natural Ruby containing multiple fingerprints
Closeups of fingerprints in Kunzite
Closeups of fingerprints in Tsavorite garnet This healing process, in essence, acts like a set of tiny "spot welds" which hold the sides together, and prevent the crack from enlarging. For this reason, the presence of fingerprints in a gem does not negatively affect its durability, and usually, unless there are so many of them that they impede light, have little effect on the gem's transparency.
Most knowledgeable observers are happy to see at least a small fingerprint in a gem, as it is very strong evidence that a gem is natural rather than synthetic! There are some inclusions in synthetic gems which superficially look like fingerprints, but close examination by a trained eye can usually identify them not as fingerprints, but as remnants of the solid fluxes used in the synthesizing process.
Several gem ehancement processes exist whereby surface reaching feathers in a gem can be "filled" with oils, resins or glass. The goal here is to disquise the crack by replacing the air in it with something closer to the gem's RI, thereby reducing its relief. This is a standard practice for emeralds, and occasionally seen in rubies and diamonds. Similar techiques are in use to fill the cracks caused by "crazing" in opals. In diamonds, lasers have been used to tunnel inside to reach internal feathers and treat them.
Oil-filled fractures in Emerald 4.
Growth Phenomena :
In single crystal gems, curved growth lines (striae) or color patterns always mean synthetic, whereas straight ones can be found in either natural or synthetic gems. Growth and color zones are best observed with diffused light or under immersion in a liquid.
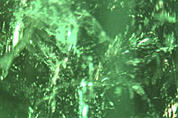
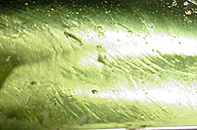
Swirl marks in Moldavite, indicating glass
Curved growth striae proving the synthetic origin of this Ruby
Straight growth zoning in synthetic flux grown Ruby
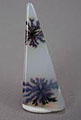
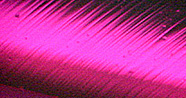
Straight color zoning in natural Sapphire The columnar or "chickenwire" pattern of color blocks in opal is a sure sign of a man-made product.
Chicken-wire and columnar opal color blocks proving man-made opal Clarity Grading of Gems :
Nature's reality is that the clarity of gems runs as a continuum from completely flawless to extremely highly included. Humans, though, always like to make boundaries and put things into discrete categories, and so it is with clarity grading of gems. Grading systems, especially for colored stones vary widely in the exact terminology they use, but all such systems describe at least four major categories of clarity :
1. Flawless :
2. Eyeclean :
3. Slightly Included :
4. Included :
Colored Stones vs Diamonds :
Within colored stones, the standards for clarity vary by species. Some types of gems occur commonly with few inclusions, while other types generally have many. Emeralds are an example of a gem that rarely, if ever, is found in clarity greater than eyeclean, while amethyst is often quite clean, even at 10x. Emerald clarity, therefore, is usually graded on a less rigorous scale than that used for amethyst. The inclusions that rate a clarity of: slightly included for an emerald, might generate a grade of "moderately included" for an amethyst.
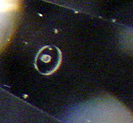
Within a species, then, the grade is set, by the overall number, position and type of inclusions. Those that affect beauty or durability will be the most important. Examples of inclusions or blemishes which have a minor impact on grade would be: a group of tiny crystals located under a bezel facet where reflections make them hard to see, a poorly polished table, or color zoning which cannot be seen face up. (In general, blemishes have slight impact on the clarity grade due to the fact that a gem can be repolished or recut to remove them). Examples of serious inclusions would be: a surface reaching fracture, especially on the girdle or crown (where the gem is subject to the greatest stresses), a "reflector inclusion" (one whose position causes light reflections to create multiple images of it) or a "stab in the heart" (an inclusion clearly visible through the table of the gem).
single "reflector" inclusion which appears, by reflection, to be many, in a Diamond
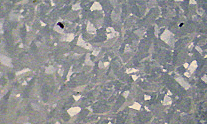
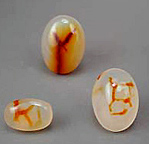
A black "stab in the heart" inclusion visible through this Sunstone's table. (near center, right) An Exception to the Rules :
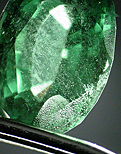
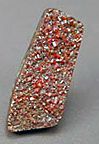
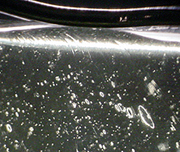
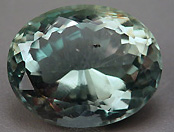
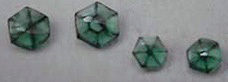
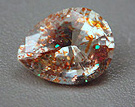
A notable exception to the way in which gems are clarity graded would be in the case of those gems whose visible inclusions create its value, rarity, or beauty. In that case, only the surrounding gem material is clarity graded. In the photos below, we see two such cases: the "trapiche" emeralds with their black "cog-wheel" inclusions are rare collectors items, and so the clarity grading would be done in regards to the green areas only, the "confetti" sunstone is desirable primarily due to its glittery hematite particles which flash gold, red and blue, so the clarity grade speaks to only other, extraneous, inclusions that might be present.
"Trapiche" Emeralds
"Confetti" Sunstone |